Saturday, October 14, 2006

Pre-Install: Product Choice


Do you have an iPod or MP3 Player and want to incorporate it into your car audio system?

There are a couple different options. The most common and easiest is to run is an FM modulator. For those who are not familiar with the process of FM modulation, the signal is transferred from the analog output into a radio frequency that is picked up by your radio’s tuner on a specific channel. There is a selection of stations to choose from to in case there are radio stations already use.

They make a few different modulators one of which is the Griffin iTrip that connects directly into the upper or lower docking plug on your iPod depending on the model. I have found this unit to have an undesirable amount of static and poor signal to noise ratio causing you to turn your volume up higher with a larger amount of distortion. Distortion is the enemy of a speaker. Too much distortion causes a heat build up which causes the voice coil in the speaker to expand exponentially, when your voice coil expands too much it literally fries and ultimately breaks.

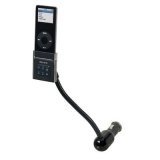
The other model you will come across Belkin F8Z063 that holsters your iPod and plugs into you 12 volt auxiliary plug (cigarette lighter) and acquires the signal from the bottom docking plug. This signal is transmitted in a similar fashion as the unit mentioned above and works much better. There is much less distortion (almost none) and the static is nearly eliminated. There are a few reasons for this: it's a better power source and has a better signal strength because it uses the constant power from the car as oppose to the battery in the iPod not to mention it keeps your iPod from flying through your car on turns or acceleration.


MP3 Players however will incorporate into your system in a similar fashion. There is a very wide selection of products, many of which follow the same technology as the iPod. However most will not harness its power from the MP3 player instead this type of FM modulator gets its power from the cigarette lighter and much like the iTrip emmits a signal which your radio tuner picks up.

The is yet another way of FM modulation. That is to use RCA style output plugs from the headphone output and plug that wire into a Universal FM modulator. Soundkase makes a nice unit which eliminats the static from emission. It is a direct in line mdulator that works in the same fashion as the others listed above. In order for this to work you must make a few power connections and may possibly need antenna adapters for many newer cars. But if you must FM modulate this is by far the best way to go.


The other option that I have found to be much more effective is the use of the auxiliary input on your radio. The high quality can be attributed to a wider frequency band and the use of one converter. Many aftermarket units have an RCA input in the rear of the deck. As drivers have become more and more focused on having gadgets and gizmos in their new cars, auto manufacturers have been incorporating an auxiliary input into their radios. Most of the time they use a 1/8th inch stereo (same plug as on your iPods’ ear buds) plug in the front of the radio. Some radio manufacturers such as JVC have incorporated a unit that will connect to your JVC head unit AND to your iPod.


Saturday, September 23, 2006

Pre-Install: Picking the Right Power Wire

One thing found on many installations by consumers is poor choice of power cable, ground wire and fuses. So, I decided to dedicate a post on feeding the current to your stereo system.


The first step of this process is knowing how much current (amps) your stereo will draw. You should be able to find this in the manual or on the web. However, these may not be available on the road so you can either add the fuses or take the total power output and divide by 12. For instance, if you are using a JL audio 500/1 your math should look like this: 500/12= 41.667. For this situation you will want to use a 50 amp fuse. You might be thinking, "why not a 40 amp fuse?" Throughout the install there are hard connections which can drop both the current and the voltage. You will want to give your amp a little extra juice to help compensate. As a rule of thumb, every splice in the wire reduces the voltage by .5 volts.

The second step is to choose the best wire size. Here is the tricky part. If your power cable is aluminum or tinned (coated in solder) you will need to use a larger size cable to help compensate since tinning reduces voltage anywheres from .5 volts to 1 volt depending on length.


Wire Gauge

This chart reflects the recomended sizes set forth by IASCA.

Now that you know your power cable requirments, it is time to get your power cable. Keep in mind that your power wire is suppose to be the same size as the positive wire. This is due to the fact that the current actually comes through the ground cable and returns to the battery in the positive cable. So the requirements are the same for the ground cable. Also, be sure to keep your ground wire to no more than four feet in length. This will help with engine noise and contributes neat install.

Friday, September 22, 2006

Basic Tips: Tools


I have come to find that a well stocked toolbox may not be as effective as a well planned well organized one. When I started my collection of tools and equipment my box was such a disaster that I would spend just as much time sifting through the jumble that even the simplest task took forever. Contrary to popular thinking, there are not many tools needed to do the job correctly. A simple array of quality tools will get you though even the most obscure installation.

The first step to building a toolbox that will satisfy your needs is to take that $2 socket set that you bought at the gas station and throw it out. I have spent hours struggling with bolts or screws when I would work on cars and bad equipment was all that was available.

The second step is to continue this with the rest of your tools. Yes I know its rude to say so but stripped heads and cross threads are nothing but headaches.

The third step (my favorite): it's time to start fresh and NO you don't have to buy from the Snap-On, Mac or Matco guy. You are able to do just as good at a CarQuest or Home Depot. A well thought out box begins with the basic hand tools.

Suggested Tools include:
Screw Driver Set- Both Philips and Straight blade make sure to get all three sizes. One thing I like to look for is an insulated driver to help prevent accidental shorts. Another great idea to help you get into tight spots is an offset screwdriver set, it will allow you to get at those 4x6's in the dash of your Chevy truck or get those troublesome screws holding the cluster bezel.
Wire Cutter / Crimper- DO NOT get the cheap ones that come in a set with terminals. You can pick up a nice pair for $10-$20. I prefer either the Channellock Klein or Ideal 9 inch combo.
Wire strippers- I prefer the Ideal strip master model there are other manufacturers such as CB and Grizzly, but I've had mine for 10 years now and they are just like new. Klein also makes the T stripper. It's not as elaborate but still does the job.
Socket Set- Keep in mind that most cars are now equipped with metric bolt heads throughout. But it is still a good idea to have both SEA and metric on hand. You will also want to have both 1/4 inch and 3/8ths inch drives. Be sure to pick up ratchets and nut driver handles for both drive sizes. Also it would not be a bad idea to get an assortment of torx bits as you will find these come in handy when you least expect it. An inexpensive way to cover your needs is by picking up them up at a Craftsman store. I actually have a set by S K, which you can pick up affordably at CarQuest.
Wrenches- More than likely you will never run into a situation in which a open end/box end wrench is needed so they can wait. But when you start doing some more extravagant installations where grounds require bolts instead of large self-tapping screws, you will want to get a set. Keep in mind to get both SEA and metric sizes. You will also need a set of Allen wrenches, both SEA and metric are needed. I personally like Wiha Allen wrenches, but there are many other brands that will work.
Meters/Test Light- OK, a meter will defiantly not be the cheapest tool in your box but it is a handy one. There are so many makes out there its hard to advise on a brand, however I have a Fluke and I would prefer no other. A test light on the other hand will only be used in simple circumstances and is not needed if you have a meter, but its still nice to have as back up.
Cordless Screw Driver- I recommend at least a 12-volt, 2-speed drill with a clutch. The clutch is key. It will prevent you from over tightening those ground screws, snapping a screw or even cracking plastic. Brands... well brands are debatable. I actually have four different ones I have a DeWalt, Makita, Ridgid, and a Craftsman. Honestly spend a little extra money and get a DeWalt. Be sure to pick up set of drill bits and an array of bits.
Miscellaneous- Yes these are under miscellaneous but defiantly not to be done without. Pliers, a couple sizes will do here 4", and 8" should suit you well. Side Cutters, Klein makes a wonderful 4" set of side cutters that work great for clean edges on zip ties and cutting open wires that are taped together with out effecting the insulation of the wire. I would also pick up an 8" Diagonal Side Cutters for cutting wire to length. For the following you may either need to be extremely innovative or pick up a Ford, and Volkswagen/Audi removal tool set. One tool that I have found myself using more and more as auto makers close the tolerances in their fit and finish is a pic set (with hook tool). I use it for more than popping trim rings and bezels and it will help with wire seperation also.